Building a Tiny Vision-Language Model with MNIST for Classification and Image Generation
TL;DR - In this post, we will train a tiny multimodal language model, also called a vision language model (VLM), that can generate both text and images. VLMs are powerful tools for tasks like image understanding, text/image generation, and classification. We will train a generative VLM on the MNIST image dataset to (1) predict the digit label from an input image and (2) generate an MNIST-like image from a given digit. This project provides a simple introduction to VLMs, implementing image tokenization with VQVAEs, and extending a text-based LLM framework (nanoGPT) to train a VLM. Full implementation code is available at GitHub.
Motivation
VLMs that can operate on both text and image data have shown very good performance on text/image generation, image understanding, question-answering, and other tasks. With the larger multimodal (mostly closed-source) models, these capabilites are extended to include audio and video as well.
Example of visual input capability from GPT-4 technical report.
Vision language models can be trained in different ways (see overview in this review paper), and many of these methods translate to training multimodal models. Training a VLM will provide useful experience for trying to train a complex multimodal model. Specifically, we will train a generative VLM, which can predict next text and image tokens depending on the task. To simplify the experiment, we will make practical design choices to focus on the main concepts.
Design choices
-
Dataset: MNIST - We will use the MNIST dataset of digit images for our experiment. This is a small dataset with ~70k images, and will allow faster iteration. We can also keep our model smaller and train it on less powerful GPUs.
-
Tasks: Image generation and classification - The “text” information we will use is the digit label for each image. So our model will be capable of two tasks (1) generation: label -> image (2) classification: image -> label.
-
Image representation - We will represent each image as a fixed number of discrete tokens. For this, we will use a vector-quantized variational autoencoder (VQVAE) that we will train on the MNIST images. VQVAEs are an extension of variational autoencoders that provide an additional encoding of the input as a set of indices from a codebook (more details here). This approach bridges image data with text-style tokenization.
-
Training pipeline: nanoGPT - We will use the nanoGPT pipeline for training text LLMs from Andrej Karpathy. This is designed for text data, so we should be able to use this to inspect our image representations. Text tokens will represent digits (0–9), lowercase letters (a–z), and punctuation, while uppercase letters (A–Z) will represent image tokens.
These design choices prioritize simplicity and efficiency, making the experiment manageable while still highlighting key concepts in training multimodal models.
Implementation
The implementation involves three main steps:
- Data Preprocessing: Tokenize both text (digit labels) and images (MNIST images) into discrete tokens using a vector-quantized variational autoencoder (VQVAE).
- Model Training: Use nanoGPT, a lightweight training pipeline, to train a generative vision-language model on the tokenized data.
- Evaluation: Assess the model’s performance on classification (image → label) and generation (label → image) tasks using held-out test data.
Code for the implementation is at https://github.com/suyashss/mnist_vlm. For nanoGPT, I created a fork of Andrej Karpathy’s original repo with some modifications (described below), at https://github.com/suyashss/nanoGPT. To make it easier to follow along, click on the “how to run” buttons provided throughout the post for step-by-step instructions on running the code.
how to run
# Set up virtual env
python -m venv ./venv
source ./venv/bin/activate
# Clone repo and install packages
git clone https://github.com/suyashss/mnist_vlm
cd mnist_vlm
pip install -r requirements.txt
git clone https://github.com/suyashss/nanoGPT
Step 0: Train/validation/test splits
To avoid data leakage, we split the MNIST dataset into training, validation, and test sets for different stages of the pipeline:
VQVAE training: For the VQVAE training stage, we will split the MNIST training data into two unequal parts, using the larger part for the VQVAE training, and the smaller for validation. This will allow us to train the VQVAE on 50,000 images, and use the remaining 10,000 to monitor performance.
Vision language model training: For the full VLM training, we will similarly use the MNIST training split as training and validation, and MNIST validation as the held-out test set.
Step 1: Tokenization
To train our model, we need to convert both our text (digit labels) and images (MNIST 28x28 images) into tokens.
- For text, we will use a simple character-based tokenizer, every character is a token.
- For images, we will train a VQVAE to get a discrete token representation of the image.
VQVAE training
Ww will train a VQVAE to reconstruct MNIST images. From this training, we will extract two components:
- Encoder: Represents an MNIST image as a sequence of 8 tokens from a vocabulary of size 26.
- Decoder: Reconstructs a 28x28 MNIST-like image from a sequence of 8 tokens from a vocabulary of size 26.
The VQVAE model code is implemented in vqvae_model.py. The encoder first produces a 32-dimensional embedding of each 28x28 image. It then divides this embedding into 8 chunks of size 4. Each chunk is approximated by its closest neighbor from a codebook of 26 4-dimensional vectors, representing each image as a sequence of 8 indices.
The definition of the VQVAE class is below.
class VQVAE(pl.LightningModule):
    def __init__(self, input_dim, hidden_dim, latent_dim, num_embeddings, quantization_embedding_dim, commitment_cost, learning_rate):
        super(VQVAE, self).__init__()
        self.encoder = Encoder(input_dim, hidden_dim, latent_dim)  # Encoder to produce latent representation
        self.quantizer = VectorQuantizer(num_embeddings, quantization_embedding_dim, commitment_cost)  # Vector quantizer to discretize the latent representation
        self.decoder = Decoder(latent_dim, hidden_dim, input_dim)  # Decoder to reconstruct the input from the quantized representation
        self.learning_rate = learning_rate
        self.latents = [] # Store some encoder output for visualization
        self.labels = [] # Store some labels for visualization
The VQAE model training is implemented in vqvae_train.py. WandB training logs for the runs are available here. The final model is saved in vqvae_mnist_final_model.pth.
how to run
python vqvae_train.pyCheck if encoding works
To check if this works, we store the encoding and labels of some batches and visualize them using t-SNE. We can see the clustering of images based on the un-quantized VAE embedding below (later, we will look at the discrete token represenations). The model can separate most digits well, with 4 and 9 being hard to separate (other pairs with overlapping representations are 3 and 5, 7 and 9). Since the VLM will see an approximation to these embeddings as input, it might also face problems separating the same pairs.

Step 2: Data preprocessing
To train our vision-language model (VLM), we need to structure our dataset as text sequences that represent either classification (image → label) or generation (label → image) tasks.
Construct VLM dataset as text
We will take the VLM training and validation sets, and construct text examples corresponding to one of our two tasks. For each (image i,number n) pair, we will randomly select one of the two training formats:
- Classification task (50% probability)
image:ABCDEFGH, number:n.###### - Generation task (50% probability)
number:n, image:ABCDEFGH.######
assuming that image i is represented by VQVAE with codebook indices [0,1,2,3,4,5,6,7], corresponding to the string ABCDEFGH.
We use “#” to pad every sequence to 32 characters.
The script format_vlm_inputs.py handles dataset construction, converting MNIST images and digit labels into the text format above. The main loop iterates over the dataset and formats each example accordingly:
 for idx, (image, label) in enumerate(data_loader):
    # Get the output from the model (encode/decode or latent representation)
    with torch.no_grad():
        # Get image representation as codebook indices
        _,_,_,representation = model(image)
        img_tokens = img2text(representation)
    # Generate a sentence with 50% probability for each type
    if random.random() < 0.5:
        sentence = f"number:{label.item()}, image:{img_tokens}."
    else:
        sentence = f"image:{img_tokens}, number:{label.item()}."

    if len(sentence) < maxlen:
        sentence += ("#"*(maxlen - len(sentence)))
how to run
python format_vlm_inputs.pyThe final dataset will be used to train nanoGPT, treating both images and text as sequences of tokens.
Next, we prepare the data for nanoGPT training.
Create nanoGPT input
To train nanoGPT on our dataset, we need to convert the structured text sequences into token indices that can be processed by the model.
Converting Text Sequences to Token Indices
We construct a vocabulary that includes:
- Digits (0–9) for number labels
- Lowercase letters (a–z) and punctuation for standard text characters
- Uppercase letters (A–Z) for image tokens (representing VQVAE indices)
- Padding symbol (#) to ensure fixed-length sequences
Each training example is tokenized by mapping characters to their respective indices in this vocabulary.
Processing Data for nanoGPT
The script data/mnist_vlm/prepare.py handles the tokenization and conversion process, ensuring that each training example is stored in a format compatible with nanoGPT.
Once processed, the data is saved as a binary file for efficient loading during training.
how to run
mkdir ./nanoGPT/data/mnist_vlm/
mv *.txt ./nanoGPT/data/mnist_vlm/
cd nanoGPT
python ./data/mnist_vlm/prepare.py
Visualizing Image Token Distributions
Before we start training, let’s look at our image tokens in the text. Each image is now represented as 8-character string containing A-Z. To visualize these, we can create histograms of the letters at each position, and look for patterns. This is only a partial visualization since it looks at each position separately, but could still be informative. Such plots of frequencies from character strings are called sequence logos and are commonly used in analysis of DNA sequences. We can use the logomaker python package to create these plots. The visualization of the images from the first 1,000 lines in the training file for nanoGPT is below (the code is in mnist_vlm_eval.ipynb).
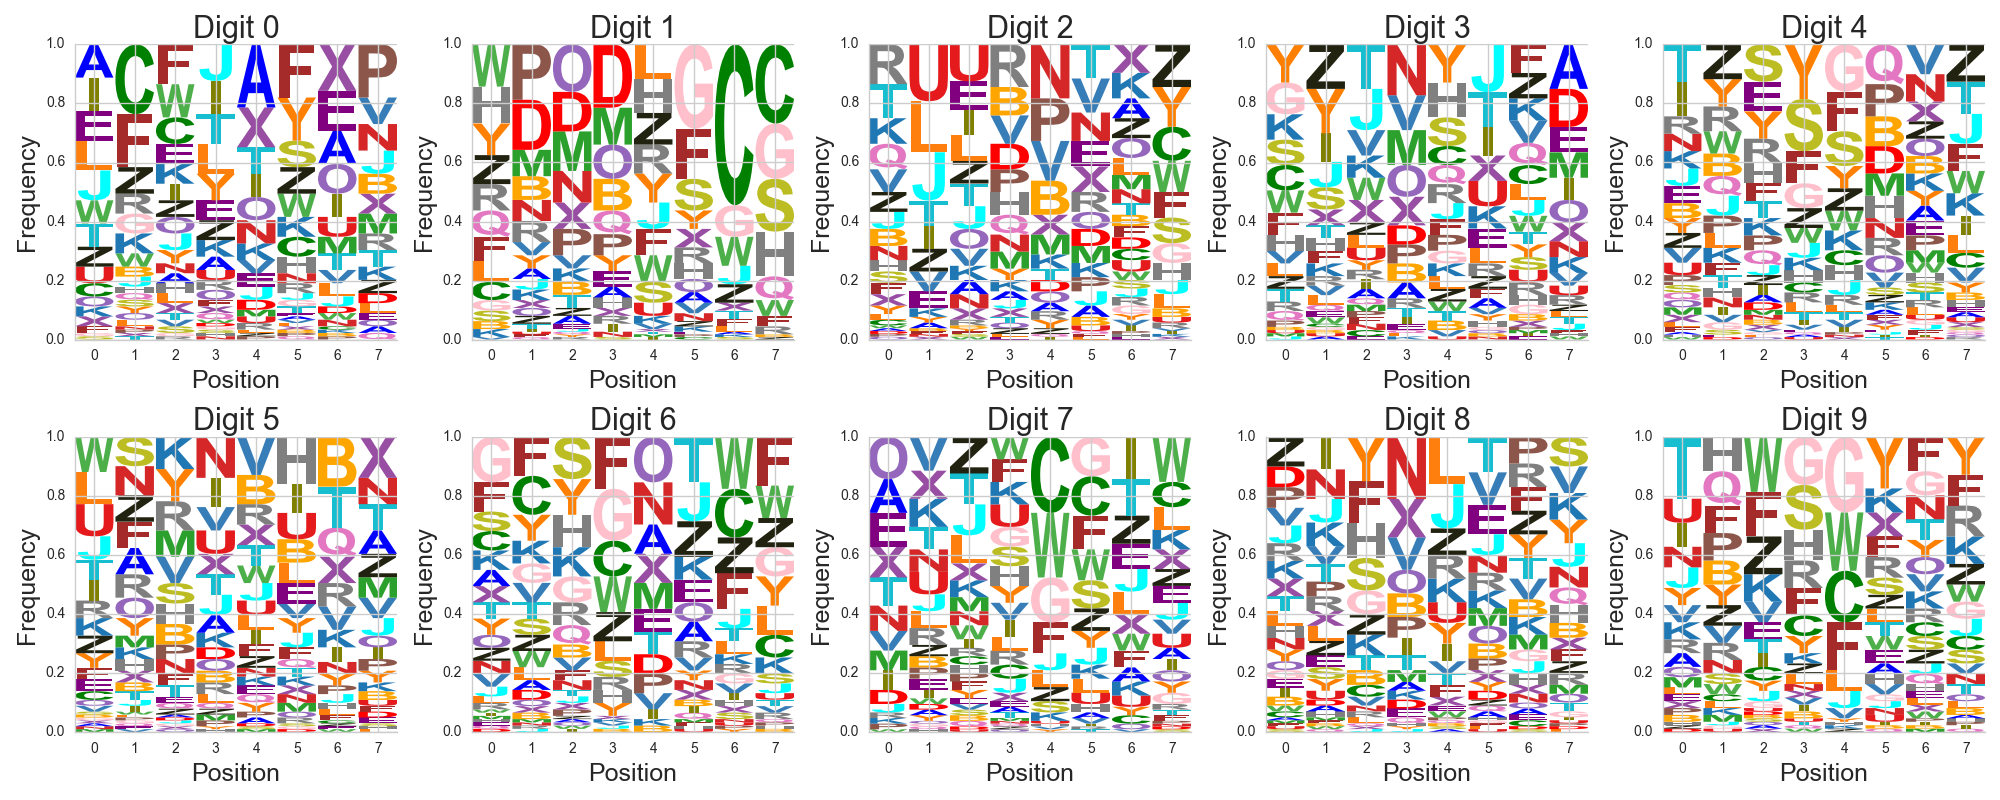
Here, we have 10 plots, one for each digit. Let’s take the digit 0 plot from the top left for example - it has 8 histograms represented by columns, one for each position. In each histogram column, the size of the letter shows how frequently the letter appears in the image tokenization. More frequent letters are at the top, less frequent letters are at the bottom. Each letter is colored differently to get an impression of the histograms.
Overall, by the letter and color patterns, we can see that the digits have different token/text representations. By looking at just the first position, we can differentiate many of the digits from each other. We can also see that 4 and 9 have somewhat similar first positions.
With our dataset now tokenized and structured, we are ready to train nanoGPT on the vision-language task.
Step 3: nanoGPT training
Now that we have structured the dataset, we train nanoGPT to predict the next token in our vision-language sequences. The model learns to generate images from digit labels and classify digit images by predicting text tokens autoregressively.
We train nanoGPT to predict next tokens from the training sequences. We will need to make two minor modifications to the original pipeline for our multimodal training:
- Ensure proper sequence sampling - The original code samples training chunks at random positions in a continuous block of text. Our MNIST dataset consists of separate sequences, so we modify the data loader to ensure that each training chunk start a valid sequence boundary.
- Saving intermediate checkpoints - To track training progress, we save model checkpoints at regular intervals. This allows us to evaluate performance over time and visualize improvements in image generation and classification accuracy.
We will use a small model with ~15M parameters, so we can train it on a laptop. The training config file I created and used for my laptop is defined in config/train_mnist_vlm.py in my nanoGPT fork. The training reached a train/validation loss of about 0.6 in an hour on my M1 Macbook Air with 8 GB RAM. In a test on Google colab with a T4 GPU, I was able to reach a train/validation loss of about 0.58 in 35 minutes using a larger batch size of 2048. The WandB training logs for the runs are here.
how to run
# Run this from the nanoGPT directory
python train.py config/train_mnist_vlm.py
With the model trained, we now move on to evaluating classification accuracy and image generation quality.
Step 4: Evaluation
To assess the model’s performance, we evaluate it on both classification (image → label) and generation (label → image) tasks using the held-out test set.
To evaluate the model, we will create masked prompts from the held-out test set, and evaluate performance on the classification task and image generation task. For classification, we can use prediction accuracy (proportion of examples where the model predicts the number label correctly). For image generation, we will perform a visual inspection of generated outputs. Code for the evaluation is in mnist_vlm_eval.ipynb.
Classification evaluation
To measure classification accuracy, we prompt the model with masked test examples image:ABCDEFGH, number:.
The model is expected to predict the correct digit label after number:.
Model accuracy over training iterations
Let’s check the model’s prediction accuracy over iterations. The code below loads checkpoints for various iterations, generates completions for masked prompts, and then compares it to the true number label. The plot shows the estimate of the prediction accuracy, and its 95% confidence interval (approximated as [estimate - 1.96*(std. error of mean), estimate + 1.96*(std. error of mean)]).
ckpts = [x*500 for x in [1] + list(range(2,11,2))]
accuracy_list = []
se_list = []
for ckpt in ckpts:
    print(ckpt)
    model,encode,decode = setup_model_and_meta("./nanoGPT/out-mnist-vlm/",f"ckpt_{ckpt}.pt")
    classifn_preds_raw = minimal_multi_sample(model,masked_classifn_egs,encode,decode)
    classifn_preds = np.array([x.split(".")[0].split(":")[-1] for x in classifn_preds_raw])
    prediction_accuracy = np.mean(labels_classifn_egs == classifn_preds)
    accuracy_list.append(prediction_accuracy)
    se_list.append(np.sqrt(prediction_accuracy*(1-prediction_accuracy)/len(labels_classifn_egs)))
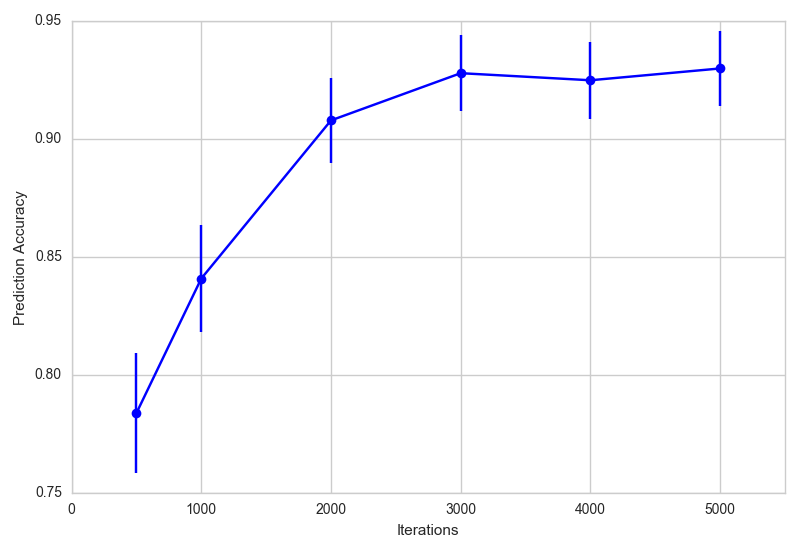
Results
- The prediction accuracy increases from about 0.78 at iteration 500 to about 0.93 at iteration 5000.
- The most common misclassification types are 4 to 9 and vice versa (around 5-7% of the time), 7 to 9 and vice versa (around 4% of the time), and from 5 to 3 (4% of the time). These match well with what we expected from our clustering visualization.
- Performance could be improved by improving our VQVAE encoding quality.
Generation evaluation
To evaluate image generation, we prompt the model with masked examples like number: n, image:.
The model is expected to generate a sequence of tokens representing an MNIST-like image. We decode these tokens using the trained VQVAE decoder and visualize the reconstructed images.
def get_reconstruction(vqvae_model, letterstr):
    try:
        with torch.no_grad():
            indices = torch.tensor([ord(x) - ord('A') for x in list(letterstr)])
            quantized = vqvae_model.quantizer.embedding(indices).view(1,-1)
            recon = vqvae_model.decoder(quantized).numpy().squeeze()
    except IndexError as e: # handle case when a letter is not between A and Z
        recon = np.zeros((28,28))
    return recon
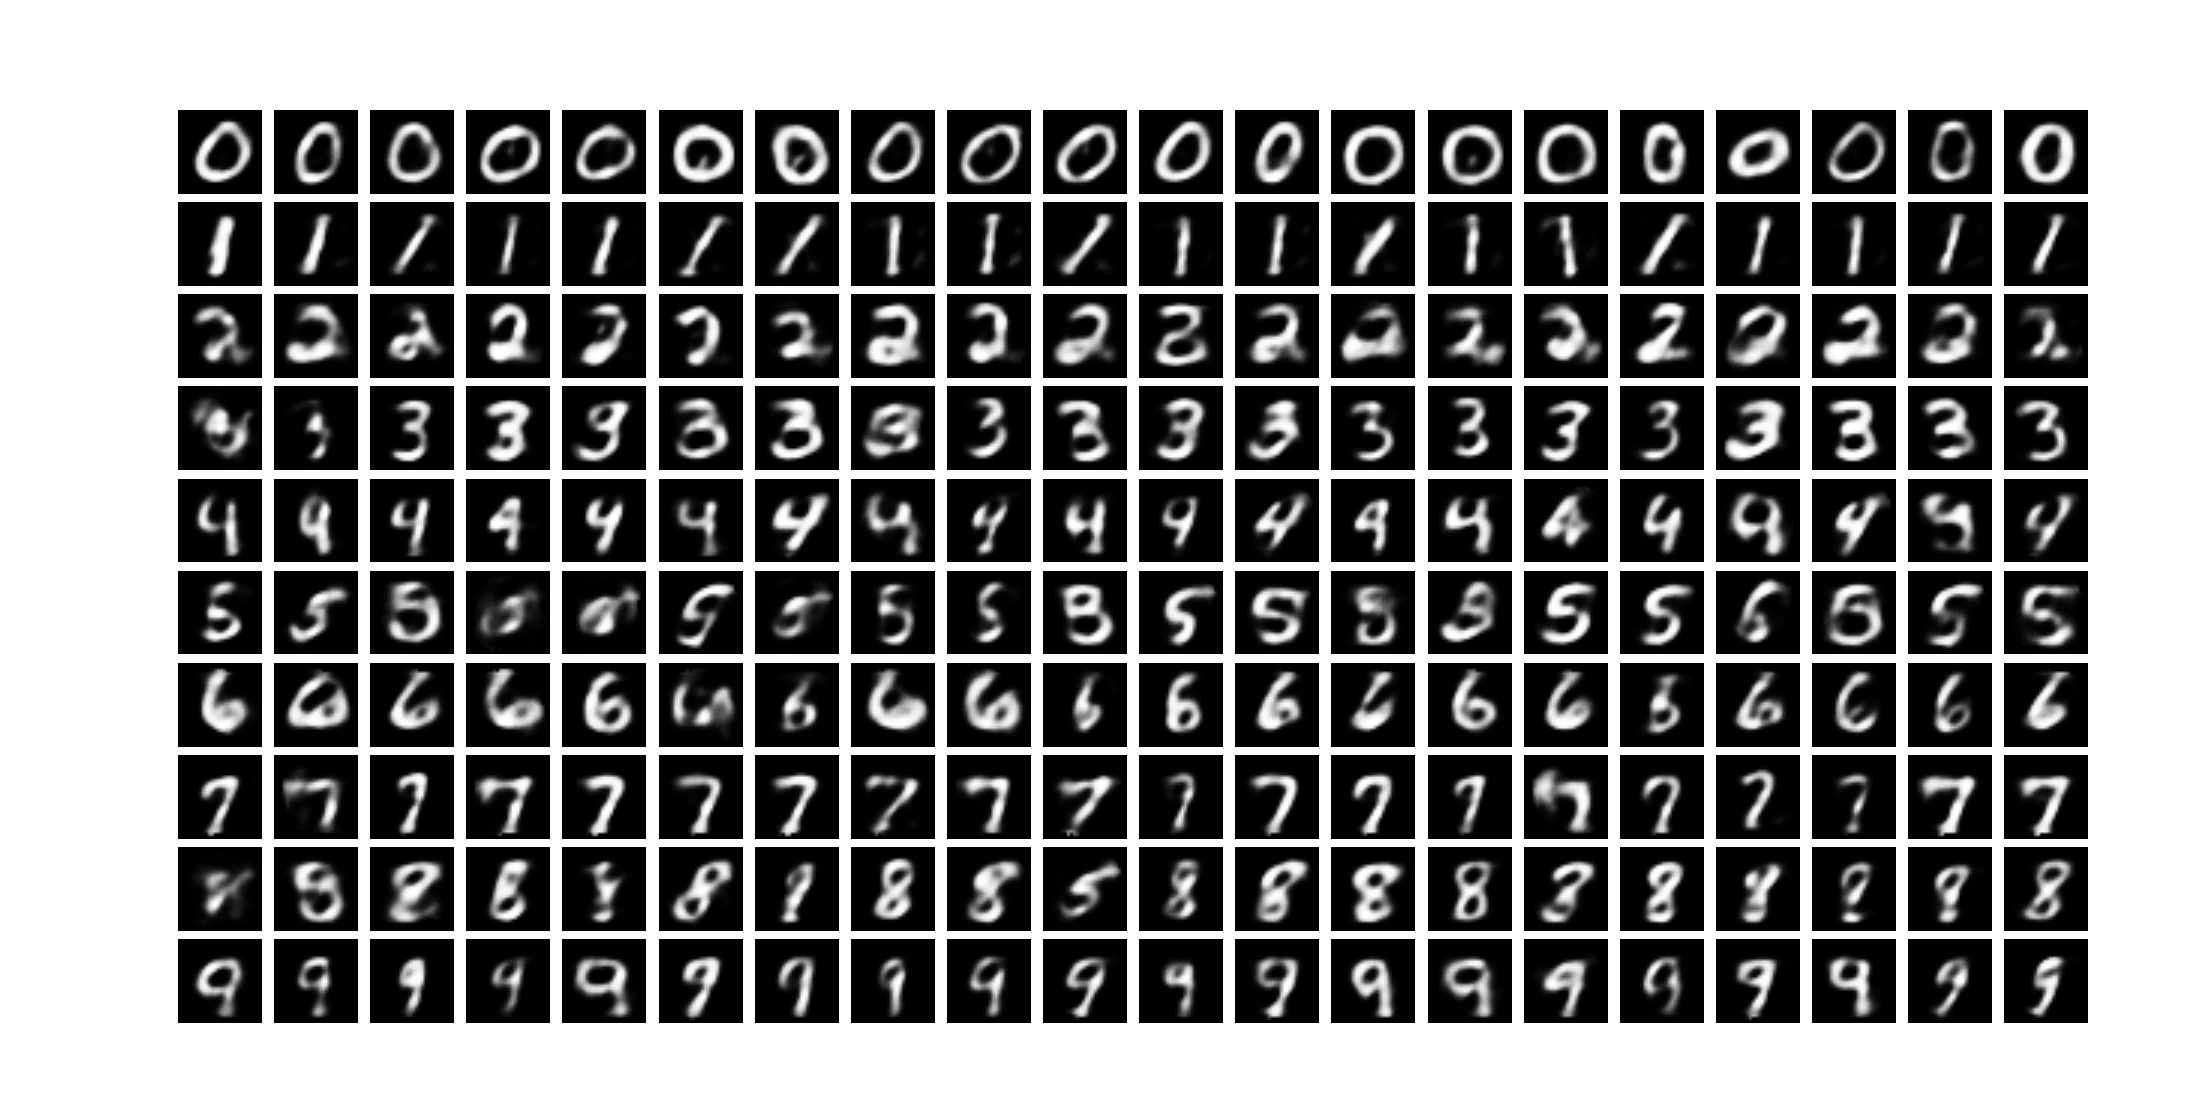
First, here are the generations from the model at iteration 500. The generations for digits 0 and 1 are pretty good, showing the model has started learning image patterns. But most other generations are quite fuzzy. For digit 7, the 7th generated image is all dark, indicating the model output a character outside the allowed range for image tokens. A number of the generated images are hard to identify as any digit at all.

Now, here are the generations from the model at iteration 5000. These look much sharper overall, and most digits (except 4 and 5) are clearly identifiable. Some error patterns are 4 to 9 and vice versa, 5 to 6 but not the reverse, and the occasional blurry image (the 2nd image for 3, and the 1st image for 8). There is still room for improvement, but this is much better.
Key Takeaways from Evaluation
- The model successfully learns to classify MNIST digits with high accuracy.
- Image generation improves significantly over training, producing recognizable digits.
- The main errors align with digit pairs that have overlapping representations in the VQVAE embedding space.
Next, we conclude with a summary of our findings and discuss potential improvements.
Summary and Next Steps
We have now built a tiny (multimodal) vision language model on the MNIST data to classify images to numbers, as well as draw images of numbers. To do this, we implemented a vector-quantized variational autoencoder (VQVAE) to tokenize images into a sequence of discrete tokens, and trained an autoregressive LLM on this sequence data using nanoGPT.
In principle, this approach could be applied to any number of modalities to jointly model them in a single autoregressive model, as done by CM3Leon and Chameleon from Meta. Alternatively, once all modalities are tokenized, one could train a single masked language model on the data, as done by 4M from Apple.
Next Steps
- Improving the VQVAE should improve image representation and reduce training error.
- Using embeddings from pre-trained image encoders could allow us to implement other types of VLM training approaches, rather than using (lossy) discrete tokenization.
- Looking at token embeddings and model activations could help us understand the model’s general behavior and some of the error patterns.
If you’d like to try this yourself, check out the full implementation on GitHub. Contributions and feedback are always welcome!
Acknowledgements and Other References
This project was easy to implement thanks to the very readable and easy-to-modify nanoGPT pipeline from Andrej Karpathy.
Huggingface has a couple of blog posts on vision language models (here and here) that go into more detail about the varieties of VLMs.
The huggingface smol-course has a section on VLMs that is a good next step up, where we can fine-tune a 2B param VLM that they have pre-trained.